Click on pictures to enlarge them
The winter guard show theme this year is based on Orson Welles 1938 radio drama "The War of the Worlds".
The director wants a 1930's style radio that would also be a platform for a performer. The dimensions would be 5 feet tall, 4 feet wide and 3 feet deep.
I searched Google Images for ideas and found these two Zenith radios. Many of the radios from this era were Art Deco style and had arched tops which would be unsuitable for performing on top of. This style of radio was know as "tombstone". I liked style elements of both so I blended the two for our radio.
I spent about a week drawing up the design in SketchUp. I added a 5'4" model on top to help see the scale. This is part of the power of using a 3d modeling program. I had to adjust the depth to 32" so the prop would fit through a single door opening. The bezel around the tuner protrudes 1" and a set of wheels at the rear would add 2" for a total of 35". Most single door opening to gyms are 35 1/2" so it would be a tight squeeze getting in the door but doable. Always keep these things in mind! It would suck to build a prop that could not get into the performing space!
The director liked the design but wanted to see it in scale to the performing space which is easy to do in SketchUp.
I added a gym space and even added the actual floor design to the gym and placed the prop in the center of the floor. Here is a shot from the judges perspective with the floor all set to the correct scale. Yes that is a large floor! 50' X 90'! Ok with the designed approved it is time to figure out how to get the performer on top of it. So back to SketchUp!
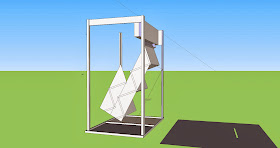
I wrestled with the stair dimensions. Stairs in your home are generally have an 7" to 8" rise and an 8" tread width. If you are slowly walking up and down this is fine but these kids will be running up and down the stairs. The first step coming down is the most important so I settled on an 11" tread width and a 12" rise. This will make the extension of the stair out the back of the prop a total of 55". The kids will have 5 big steps to the top but hopefully the wide stair treads will give them confidence coming down. Now how attach the stairs? I could build a frame for the stairs and just make a way to attach the stairs to the rear as a separate piece but looking at the big empty space inside the prop made me think I could make a foldable stair that would stow inside.
Think attic stair! I split the stair and rotated it under. After rotating the stair inside using SketchUp I found the top tread stuck out the back of the prop 4". So I moved the pivot point inside the box 4" and voila' it fit! I then added a 2X4 to the top tread to do 2 things. Strengthen the attach point of the hinge and to act as a toe kick so the performer could not get their foot trapped if it landed inside the box.
I could finish out the drawing if I wanted too but this is a working drawing and is at the point where I have all of the dimensions I need to build the prop.
You are probably wondering how I will build this? I could certainly buy 3/4" plywood and build the whole thing with it. But it would be extremely heavy. 3/4" plywood weighs 60 pounds per sheet and it would take 3 sheets to build this. So I decided to use typical cabinet building techniques and use 1/4" lauan plywood with internal bracing and a 3/4" plywood top. This will reduce the weight to less than 100 pounds. Much more manageable.
Here is the beginning of the construction. I am not going to go into a lot of detail about the construction. It is simple cabinet construction. I did overbuild the top by using 1x6 around the perimeter under the 3/4" plywood top only because one of the parents of one of the guard members expressed concern that it would not be strong enough and I assured her it would not only support 1 person, it would support 3!!! And it does! LOL!!! Below is a couple of pictures of the interior construction then I will move on to the stairs.
Here is a view looking down through the top before installing the 3/4" plywood top.
This is a view of the front bottom corner. The bracing is either 1X2 or 1X1 1/2. The piece of plywood you see on the right is where I glued another piece of lauan plywood to the inside of the front panel so the grill cutout would have a double thickness. The grill cuts left only a small amount of wood so I did this for strength and to give the effect that the cabinet is thicker than it is.
NOTE: All of the plywood was attached to the bracing with crown staples and glue. It is key to glue everything! This is where most of the strength comes from. All of the pieces of wood must be securely tied together and the only way to do this is with glue. The staples and/or nails are only there to hold it together until the glue dries! I used 2 1/2 BIG bottles of Titebond wood glue putting this together!
Another thing to note is where you see the butt end of a 1X meeting another 1X, as shown above, they are joined together using biscuit joints. I like biscuits. They are fast and cheap. I am all about cheap and effective!!! Other choices are pocket screws and dowels. Whatever you like best.
OK now we will go through the stair construction and attachment method.
Building stairs are not something you can take lightly. The stairs have to be designed properly and must be solid and secure! They must have ZERO flex and no wobble! Performers will be running up and down these stairs. They will take stresses you home stairs will never see. The performers may approach from an angle putting lateral stress on the assembly as they bound on to the first step. You must take all of this into consideration when designing the stair and how it is fitted to the prop.
A beefed up attic stair design meets all of these criteria. This stair is built completely from 3/4" plywood. The wider stair tread requires a wider stringer which is stronger. The stair treads are set in a shallow dado (only 1/8" deep) to maintain stringer strength. But the real key to the strength was the use of through bolts.
To really make the tread to stringer attachment super strong I used another trick by employing the use of thru bolts which are 1/4" threaded rods that run thru each stringer and thru the tread binding the entire assembly together. I used 2 thru bolts per tread. The thru bolts are set into a 1/4" X 1/4" dado as you can see in the above picture showing the underside of a stair tread. And of course the stair treads are also securely glued to the stringers. All of the elements together make a practically bullet proof stair that can handle one 180 lb performer at a time with no problem.
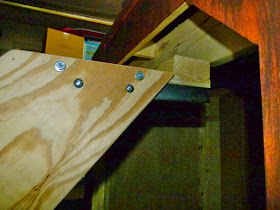
Here is a view looking at the top tread attachment from INSIDE the box looking out the rear. Since the top tread extends 4" inside the prop it is 15" in width. A 2X4 is bolted to the top of the step and the continuous hinge is attached to the 2X4 with 1/4" X 2 1/2" lag screws. The upper part of the hinge is attached to the 2X6 with 3 1/2" lag screws. The pivot pin of the hinge is positioned so the top of the step is exactly 12" below the top surface of the prop.To attach the top tread to the top of the stair stringers I bolted angle iron using carriage bolts to make the joint super strong. As you can see there are thru bolts binding the stringers and stair tread together. This continuous hinge is a speciality industrial item. I could not find it at the big box store. The hinge pin is 1/8" diameter rod.
Here is a view from outside. 2 carriage bolts through the stringer to the angle iron and above them are the thru bolts running through the stair tread. Note the 2X4 bolted on top of the extended length of the stair tread.
The stair hinge is a simple but strong design. It is 1/16" steel 3/4" wide by 6". One piece is flat and the other piece is offset on the end the thickness of the metal. You can't buy this. I hand made this out of sheet metal stock. It really is as simple as it looks.
To make the hinge really strong the hinge is doubled with a hinge on the outside and one on the inside. tied together with a 1/4" bolt.
Here is a view of the pivot. I cut a piece of 3/8" copper tube to act as a spacer between the hinges. This spacer keeps the metal from rolling under stress. The bolt is not tight. I ran the 1/4" nut in until it was tight and then backed it off 1/2 turn. Since I used a locking style nut, it will stay put. A drop of oil on the hinge and it operates smoothly.
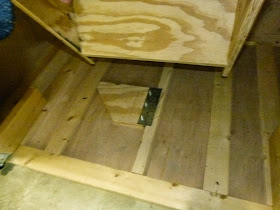
To hold the stair inside the radio I fashioned this simple hinged block.
I cut a shallow notch in the block to hold the block upright. The notch will keep the block from falling over if the stair bounces off the block during transport.
So when the prop is set on the floor you simply push the stair forward, slap the block down, swing the stair out and swing the lower section out and set the stair on the floor. Done!!! The whole process of placing the stair takes 5 seconds! And just slightly longer to stow the stair! In competitions speed is important!
To roll the prop on the floor I added this simple wheel on each side. The idea was to tip the prop back on the wheels and roll it off the floor. Make sure the wheel does not contact the floor too soon while tipping back or the prop will simply roll toward you. I experimented with the angle of the cut of the 2X4 until the wheel was about 1/2" off the floor. I used 3ea 1/4" by 2 1/2" flush head wood screws (through the bottom) to screw the 2X4 to the base. I did this so I could easily remove the wheels if needed. Later I made a dolly to transport the radio and removed the wheels. If you watch the video you can see the dolly at the end of the performance.
The Tuner
This blog is really long now so I will just breeze through this. If you want more detail about how I made the tuner just comment!
All this really is, is a 16" diameter wall clock that I bought at Target and ripped out the clock face and guts. I found the tuner face on google images by searching "1930's Zenith radio dial face". A friend that works at a company that does signs, sized and printed the dial face on translucent plastic to the right size. I cut a piece of 1/8" acrylic sheet to fit where the clock face was and spot glued the face to it. I reused the clocks hour hand to make the tuner dial. (It does not move). To back light the clock face I bought a 27 LED light from Harbor Freight. It is battery powered and mounted the light in a 5 quart oil drain pan I bought at Walmart. I cut the power wire in the light and wired in a rotary switch (for a table lamp) that I bought at Home Depot. Sometime you have to go to a variety of sources to put one thing together!
Here it is from the inside of the radio. You can see the LED light mounted on the oil drain pan with the wires running to the rotary lamp switch. I lined the inside of the pan with aluminum foil to help reflect light. The 2 bolts you see below the pan are the holders for the 2 non-functioning knobs on the front of the radio.
The knob on the left is the one with the rotary switch and turns the light on. It looks extremely bright and it is! I wanted the spectators to definitely see that the light turned on! Oh, the knobs...what are they made from? Yep... those are hairspray can caps!!! LOL!!! Use the things around you. You do not have to hand fabricate every piece! Cheat when you can!!!
Here it is all finished and ready! The director applied the faux wood finish and it is awesome and functional. The bright yellow trim not only makes the trim stand out, the bright paint also clearly defines the border around the top so that the performers on the prop can clearly see the edges. Since this radio is upsized, the grain had to be upsized too!
Here is the link to watch the show!


Such awesome work!!
ReplyDeleteSpeechless. It gives me hope we'll sort out our issues over the summer.
ReplyDelete