How to plan, design and build Marching Band and Winterguard Props and Sets.
(Fall Marching) A Lighted Panel
A Lighted Panel Click on images to enlarge them
Here is an example of how to make a lighted panel that shows a a simple black panel until you throw the power switch on. This example was used in a fall marching show called Vegas but could be adapted to winter guard with a few modifications.
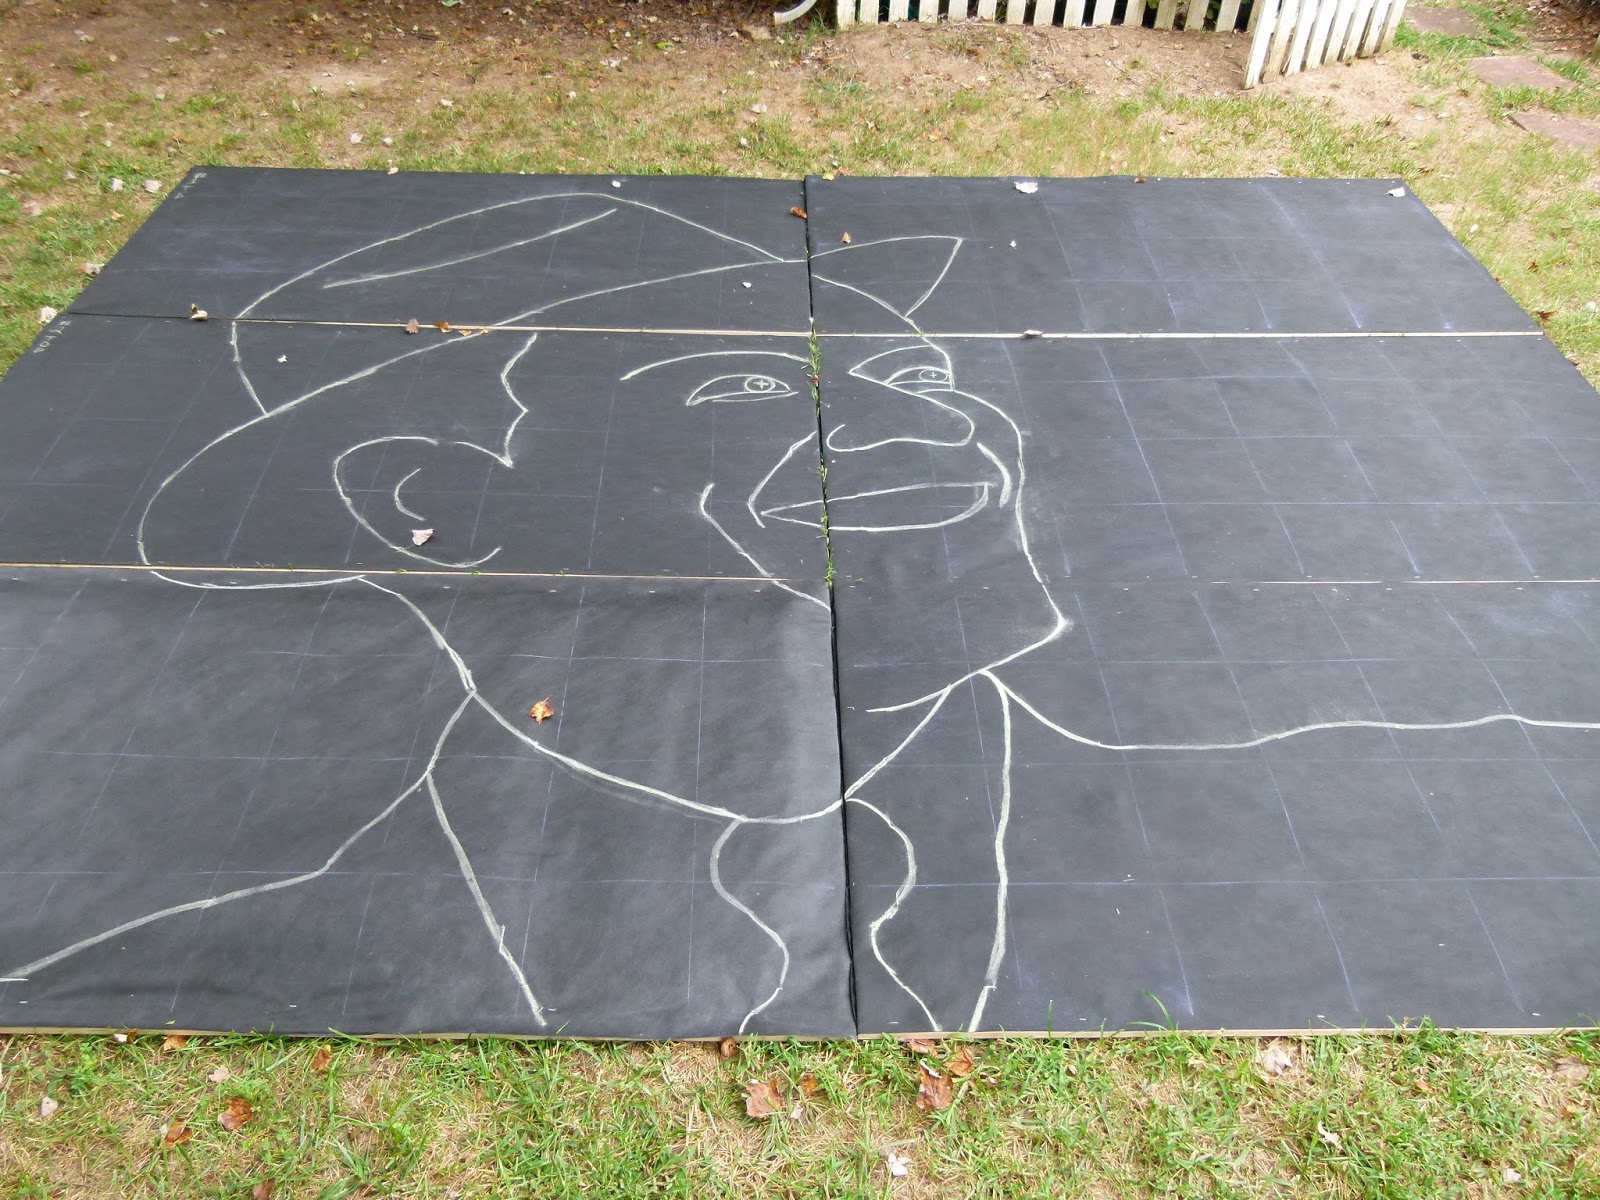
This is a silhouette of Frank Sinatra. He is about 12 feet tall and spans across 6 four by eight foot panels.
It started from this image from Google Images. I just opened the image in Photoshop and created a layer over the image and used a Wacom Tablet and stylus to trace the image until it looked right.
I then laid the sketch over a grid template and adjusted the image size until it fit and the breaks between the panel fell in spots that would make it easier to route the rope light. The template represents six 4 x 8 panels divided into 1 foot squares. The printout fit onto a 8.5 X 11 standard sheet of printer paper.
Once the director approved the sketch I built the frames. The frames need to be as light and strong as possible. We tried using peg board stiffened with a wood frame but it was so heavy it nearly collapsed the supporting structure. This frame is made from 1 x 4's and biscuit joints were used to attach them together. You could also use pocket screws or dowels. The frame needed to be flat so lap joints were out. In the corners I used 1/4" lauan plywood to reinforce them.
The plywood was glued and stapled into place.
Then the panel was covered with the thick ground cover fabric I bought a Sams Club and edge stapled. The rope light is sandwiched between this fabric and the cover fabric. This fabric needs to be thick to block as much light as possible to reduce backlighting.
After the six panel frames were complete I snapped chalk lines to make the 1 foot square grid pattern and used the template above to sketch the image with sidewalk chalk.
Since the props also say VEGAS! the G and A were added to this section.
Here is where I failed to get pictures so I will describe how we installed the lighting. We needed a way to fasten the rope light to the panel tracing the outline of the sketch and would hold the rope light securely. We settled on using 1/2" X 1/2" hardware cloth 48" tall in 50' rolls. We got ours at Tractor Supply. We rolled it out over the panel and stapled it down to each individual frame. Then we ran the rope light and fastened it to the hardware cloth with zip ties. PRO TIP- To make sharp crisp turns (as opposed to rounded turns) with rope light, create a small loop and cross the rope light at the angle you need. Then wrap the loop with electrical tape to block the light from the loop. Use the same wrapping technique to create transitions using the tape to block light from unwanted sections. Pay attention to the maximum length of each run or your light section can start to dim.
After running all 650" of rope light we covered the panel again with the thin ground cover fabric I bought at Home Depot. As you can see, you can not see any of the rope light...
Until you turn the power on. Frank is in there too behind the G and A and on a separate circuit. The panel looks good in the daylight but even better when it is dark outside under the stadium lights. Buy the super bright rope light!!! As you can see the entire prop is made up of eighteen 4 X 8' panels. Each letter is made up of 3 panels that are hinged together and folds up like a brochure where the bottom of the V folds back to back and the top of the V folds face to face like a Z. The prop is in 2 sections with the VEG as one section and the AS! as the other. See Below. There are a pair of hooks at the top of each section (letter) that fit into a U bolt mounted into the supporting tubular prop frame. Note: The rope light does NOT cross panels! Since the panels are hinged and have to fold there is no way to cross the panels so route the rope light so it terminates at the edge of each panel. With the letters we notched the panel at the edges and terminated the rope light behind the panel.
Here are the prop frames being assembled. They are 7' tall scaffolding and we used fencing pipe to make the diagonal bracing. Each 24' section is made up of 3 scaffolds with diagonal bracing.Also note the lighted panels stored in equipment rack on the left and one on the ground all folded up. Each folded section weighs about 60 pounds. It is important to note that the hinges for the panels are the long strap door style hinges so the hinge would attach across the perimeter wood frame to the 2 inside vertical pieces of 1 x4. If you hinge the panels together from the perimeter frame it will pull apart.
Here is the supporting structure ready to hang the panels. The panels are hung on the frames (laying down)and lifted with a cable and ropes with a 1000 lb hand wrench. You can see the back side of the U bolts that the hook (fastened to the top prop panel) goes into on the top rail (foreground). The procedure to raise the panels was to winch the frame up to about 4' in height and set the 3 folded panel sections under the frame and lift the top panels up and place the hooks in the U bolts. Once all 3 panels were in place someone would crank the winch and lift all 3 sections at once. We had about a dozen people hanging on the back of the scaffolding to keep the whole shooting match from tipping over while lifting!!! The panels would unfold and once the frame was winched all the way up we would use a whole bunch zip ties to attach the panels to the frame to keep them from swinging and U bolts to secure the support structures 3 vertical poles to the 3 sections of scaffolding.
Then it was time to wire it up. All of the rope light ends had a regular house electrical plug which we would plug into a power strip and the power strips were plugged into a control panel you can see here by the green ladder. The control panel had regular light switches mounted in it and each switch controlled one effect. Either the VEGAS! or Frank or the side displays. The panel was powered by 2 3000 watt portable generators. One generator for VEGAS! and one for Frank and the 2 8X12' side displays you will see in the video. 650 feet of rope light takes a lot of power!!!
Looking at the video it is hard to believe the center prop is 48 feet wide and 12 feet tall!!! This is a good lesson. Props need to be as BIG as possible! Because a football field will shrink them considerably!
In Retrospect
This was the most complex build I was involved in. And the most expensive too! It was a lot of work for all of us and I did not even talk about the other small supporting props and flags that were custom made for this show but we had an incredible season that everyone involved will remember forever! And that is what it is all about. Would I build this the same way again? Absolutely not! If I had to build this again I would make each 8 foot section separate on it's own rolling frame, not the 24 foot sections we made for this show. It is just too much to assemble and get to fit together and lift into position. Since the panels were in front of the wheels on the scaffold, the prop was susceptible to tipping in moderate wind. The panels either need to be tipped back or placed behind the wheels to move the center of gravity inside the base of the frame so the whole assembly is as stable as possible. Instead of hinging 3 panels together I would make them independent and simply bolted the panels to the frame instead of hanging them.


can i ask what it cost to make this?
ReplyDeleteI would budget 6K for this.
Delete